


I love planning in advance. For me a good plan is cause to relax and breathe deeply, knowing everything will be taken care of. I've tried lots of different kinds and while I loved my old planner (This sweet little Filofax!), I was going to have to upgrade to something giant to meet my needs- so I wanted to try making one first. I'm glad that I tried because, after a month of using my handmade planner, it's official. It's not a crush, I'm in love! My planner has been through the wear and tear of my bag and is holding up beautifully- and the best part is that I get to use something super functional and handmade every day.

There are basically two parts to any bookbinding process: making the signatures & securing them inside the cover. The signatures are sections of paper that have been gathered up and sewn together and kept safe by the binding. While it's relatively simple, your first try can be really intimidating. This should guide you through your first bookbinding experience pretty much painlessly, and I'm always here to answer questions :)
The great thing about this is that it's 100% customizable to your needs! I'll be showing you the methods you can use.
![]()
To create a signature you'll need a piercing tool (an awl), waxed thread or heavy hemp thread, a papercraft needle (they're larger and easier to work with than a large sewing needle) & blank legal or letter sized pages. Bonus points for a self-healing craft mat, and for being careful not to ruin your tabletop if you don't have a craft mat :)
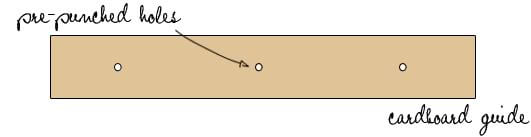
Step One: Make a Guide
Before I start working with the pages, I like to make a guide to help make sure that the holes in my signatures are all positioned in the same place. In bookbinding speak, this is called a jig- and it's important because if you don't use it when you sew the signatures together they'll all be crooked! To make the guide, take a section of cardboard and cut it to be the same height as the pages (8 1/2″). Punch holes in it along the center line, spacing them out equally so the stitches holding in your binding will distribute tension equally.
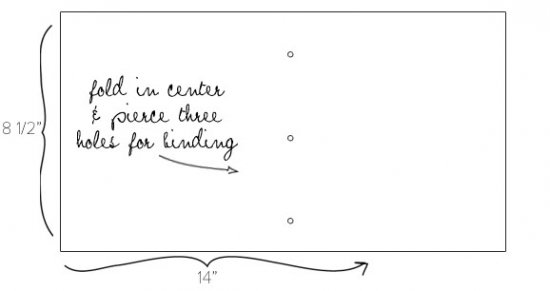
Set aside the sheets you'll be making into signatures, and place in small stacks. Group by group, fold the papers in half, making a strong crease. Ta da! It's almost a signature now- it's that simple :) Each signature can have as few or as many pages as you like, so gather a small group and you can remove or add sheets until the signatures look balanced and right to you.
Once you've folded & creased the signatures, take a small workable stack, place the guide on top of the crease and use the piercing tool to punch through the signature.
Now you're ready to stitch the signatures together! This will change slightly with the binding method that you choose, but this is the method I used.
Want to get fancy? Add Tabs & Covers: If any of the signatures will be a complete section (ex. my monthly calendars all fit into one signature) you might want to add a lightweight card stock cover or tab to them. To make a tab, cut the card stock just slightly wider than two of the guide's holes and slightly longer than half of the signature. They wiggle around a lot, so you'll have to make the tabs separately from the signatures, but once you've pierced the tabs you can slide one over the outside of the signatures just before you sew them and trim them down to fit afterward. It makes the end result look super fancy.
To sew the signature, thread the waxed thread through the papercraft needle. Poke the needle through the center hole, moving from the center of the signature towards the outside (see below) while leaving a tail long enough to tie.
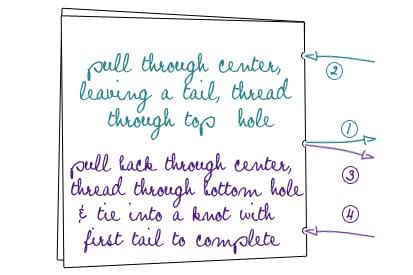
Pull the needle through the center hole and up through the top hole, then back through the center hole. Finally, pull the needle through the bottom hole. Pull the thread tight, and tie a secure knot. Your signature is done! Just create as many signatures as your planner needs and you're ready to bind.
![]()
There are lots of great ways to bind your signatures together and get a clean beautiful result. It just depends on the look that you're going for! No matter what, I recommend making sure you do a few things to make your planner lasts when it's being beaten up in your bag:
- Use a thick chipboard as the base for your cover, the thickest you can find! It will make sure your planner's hard enough to write on and can stand up to a year of use.
- Make sure you make your cover larger than your pages- and even bigger if you want room for a pen to be tucked inside your planner.
- Cover the chipboard in a thick vintage wallpaper to make sure that what makes the cover pretty is as durable as the cover its self. Keep an eye out at thrift stores & you'll have lots to choose from quickly.
- If you're trying to decide between using glue or tape, for any part of this? Use glue, it's built to last!
- Wrap the inside and outside of the cover in wallpaper, glue it to the chipboard and then mod podge the inside of the cover and let it dry. It will make your working area that little bit more durable.
For a detailed exposed spine…
The Coptic stitch is a method where you bind through the sides of the signatures. This leaves the backs of the signatures exposed- but you can make them more durable (and prettier!) if you add a patterned cardstock “cover” to them. This method lays completely flat and looks beautiful- almost like there's a friendship bracelet running across the back (see here).
For detailed instructions I recommend you try this tutorial, it gives lots of detail & photos!
For a perfect finish…
A true hardcover look is harder to get at home, but it's definitely achievable. A great way to do this is to add cloth and glue into the equation- and even weaving the signatures together. For this method, you secure the signatures to each other, reinforce the bond with cloth, and then glue the signatures into the cover. It requires access to a small vice or some really heavy books, but the results are gorgeous!
For a step by step walkthrough check out this tutorial or this one for real photos or this guide for lots of detail and cute illustration!
For finishing touches…
To make my planner perfect for me, I added an elastic closure that loops around the front cover, and another smaller one that holds my pen. I also added a pocket in the front cover, made with cardstock and held in with strong glue- and I bought a resealable pocket with an adhesive back from an office supply store that keeps receipts and loose ends together neatly. You can add anything you like to make it work for your life!
Creating my planner was definitely a bit of a production, but I've been fascinated by bookbinding for a long time and really wanted an excuse to learn- and having tried it once I think I'm hooked! It's not a project for the faint of heart, and there's lots of planning that goes into it, but it's so much fun to enjoy it every day!
Who knows, maybe if you're really nice to me you'll get one for Christmas next year ;)
LAST UPDATED ON: February 2nd, 2011
CATEGORY: DIY Day Planner Design
Hi, it has been a really long time but, I just wanted to know, how and where did you create your printable. Could you please post a blog tutorial on how to create the printable? Please?
how do i subscribe for the planner camp ?
Thanks for asking – visit plannercamp.com and if you sign up for information you’ll be sent the course details :)
This is a great post. I recently sewed several signatures (similar to Moleskine Cahier) to use as a travel journal. On my recent trip I filled 3 of the signatures. Do you have any tips on sewing or binding these together? I’m struggling to find instructions on connecting previously sewn booklets together.
I just found your blog yesterday and from one organization/productivity junkie to another, thank you! I love your posts and am so excited I came across your blog! I can’t wait to read more.
A little tip for those who said they were the faint of heart when it comes to book binding: I’d suggest designing a digital cover (using a favorite photo, or perhaps just your name in a cool font) using the same paper size as your word processor page for the calendar pages. The take all of your printed pages (or PDF doc on a USB drive) to a local copy place and have them printed and then bound with a spiral. Your planner will lay totally flat when open and you can always slip it into another planner cover you fall in love with. I have a leather Franklin Covey planner cover and am working on a new homemade planner to slip inside of it. It looks professionally done from the outside but is all handmade on the inside. :)
Kyla, thank you again for these great posts. It’s definitely inspired the direction I’m taking with my new planner. So fabulous!
Kyla,
I just love your planner! I was wondering what the name of the font is that you are using in the above pictures .I am planning on making one planner like yours since it is so cool , I tend to be a planner nerd myself.
I love this idea! :D like someone else commented on part 1, I’ve been searching for the perfect planner for forever, but none ever had all the parts that I needed in one planner. So this is perfect! :D
And also like Melissa commented, is there anywhere that you’ve posted more photos? Or would you be able to post more photos of it? Mainly the insides of it, and how you did the dividers. Another question is what would you recommend to make the cover out of? I’d prefer it to be really sturdy and durable, and I’m just worried that it might not withstand everything.
Again, amazing creation! :D
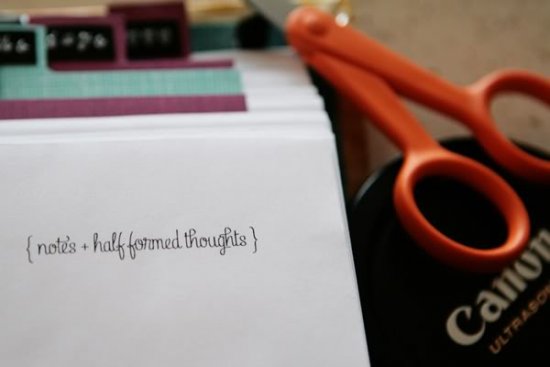
I absolutely love the font you used for the “notes + half formed thoughts” and so on.
Where can I get it? what’s the name?
I’ll be trying to make myself a day planner for next year in the next few weeks, your tutorial makes me think I can do it!
i love this and i am totally going to try it. do you have any more photos of yours you could post? i’m such a visual person and i was hoping to see more details:)
thanks for the info!!!
I featured this in my Weekly Favourites post http://the-red-deer.blogspot.com/2011/02/weekly-favourites_20.html
I agree with the others that said they buy it if you had them for sale in your etsy shop!
Cute!!! Love it. I took bookbinding class in college and it was fun!
This is SUCH a good idea…I wish I had thetime to make one for myself. The planner I purchaed for 2011 is TOO SMALL!
Color me impressed. You are so talented! I know my ljmits – and this is beyond them unfortunately. but I’d love to purchase one some day! :)
I WISH I had a planner as cute as yours! I loathe my planner and it’s wal-mart generic-ness, but I can’t leave the house without it so one like yours would be so much better to carry around with me :)
P.S. Your blog always make me smile, I wish I lived closer to Winnipeg!
Adorable! I LOVE planners; mine never leaves my purse. :)
I love this! I just wanted to know the actual size.
thanks,
AWESOME kyla. i love love love this. right now I carry around 4 different little note books to keep my mind organized. so many things to keep track of! Having it all in one space would probably help me :)
-Moorea
pps: i am dying to know what font you used on that last photo…. ?
The font that’s on the planner page? It’s a new font I just purchased for my new blog design (coming in the next 1-2 months), I’m glad you like it too! :)
It’s been a very long time, but I’m wondering if you’d be willing to share the name of the font here? I too am in love with it!
Hey Sam, if I can find it I’ll share it! There are a few fonts you could be referring to, including the one that I used in the post about the planner but not the actual planner. Can you let me know where you see the font you mean, and ideally what it says so I can be sure I’m giving you the right font name?
Kyla I was referring to the font in the last photograph that reads ” { notes + half formed thoughts } ”
Thanks for your quick reply!
Perfect! I’ve got it- it’s a paid font called “Linguine” that I purchased a few years ago for my blog branding, but that didn’t stick. Hope it helps!
uh, yay. i have been DYING for part two of this. i already put together my own little template in indesign which meets my needs and was waiting for the tutorial on how to put it all together. now, i do have to admit it does look a bit intimidating but i’m so excited about possibly having the finished product in my hands i’m gonna try!
ps. i think these would be a great addition to your shop. definitely!
YES!!! I can’t wait to try this! It will probably take me forever, but I think it will be worth it! Do you know where I can get chipboard in the city? I was originally going to use a cereal box…but I think it won’t last.
I would call around a little to be safe, but art and craft supply stores should be your best best. If you want to make it super durable, ask for binder’s board or illustration board too- they’re firm & flexible but really strong :)
I purchased 5mm-thick foam board at Michaels for the cover, because it seems very durable and light-weight! I’ll let you know how that goes.
Kyla, how can you post this on a Wednesday, when I two more full days of work before I can go home and try to make this beautiful, custom piece?! I want to do it RIGHT NOW.
This is really awesome… exactly what I need.
I second the idea to sell them in your Etsy shop! Now I understand why hand-bound books are so expensive.
I have to do book repair at work so I’m trying to find a bookbinding course that I can go to. It would be such an amazing craft to learn!
Dear Kyla – please sell these in your shop. I don’t think I’m crafty enough to make one myself but I would TOTALLY buy one! Love, a fellow type-A planner person :)
I’ve seen your name all over the blogosphere but I don’t know why it took me this long to actually dive into your blog. Loving it so far. You’ve been added to my reader :)
Love the detailed tutorial!
Aw thank you Lauryn, I’m so glad you stopped in! I can’t wait to check out your corner of the internet too :)
I LOVE this and really want a pretty planner that can be customizable (I think I just made the word up) with lists, blog ideas, etc. but I don’t think I’m crafty enough to pull this off. I agree with Jenn, any chance of these showing up in the etsy shop? I love you lots and will send apple butter.
Okay so I’m *dying* to try this except I have none of the skills or supplies or vocabulary to do any of the steps haha… BUT I would definitely snatch one up if you put it in your etsy shop :)
I was actually thinking that it could be a fun item for my etsy shop! They’re just such a big time commitment that I would have to do them as one of a kind, custom pieces- but that would be fun! We’ll see… :)
HI! I would LOVE to buy a custom piece! I would love to make one but don’t have the time or skills to really figure it out! Email me if you’re interested in helping me out :P I have a VERY needy life with a lot of areas that get lost in random spiral notebooks haha
Thanks for letting me know, Toni! I’m not offering custom products at the moment, but It sounds like you might be interested in my course, Planner Camp, that teaches you how to design your own day planner or agenda. It uses software that’s available on a free trial for a month, which is lots of time to create your design. I’m working on the course now, and if you sign up for the waiting list you’ll be notified as soon as it’s ready this fall.
<3!!!